If you’ve ever felt like your makeup looks different on you than it does in tutorials, you’re not alone. The secret often isn’t the product—it’s understanding how to tailor contouring for face shapes so it enhances your natural structure instead of working against it. This article is designed to help you identify your face shape and apply contour techniques that create balance, definition, and harmony.
We break down the science behind light and shadow placement, explain why certain contour placements work better for specific face shapes, and provide practical tips you can apply immediately. Our guidance is rooted in established makeup artistry principles and skincare knowledge, ensuring techniques that are both effective and skin-conscious.
By the end, you’ll know exactly where to sculpt, soften, or define—so your contour looks seamless, natural, and uniquely flattering to you.
Sculpt and Define: A Pro’s Guide to Makeup for Your Face Shape
Makeup isn’t about changing your face; it’s about enhancing your natural bone structure with strategy and light.
Generic tutorials fail because they ignore the biggest variable: face shape. A 2023 consumer beauty survey by Statista found 62% of users felt online makeup tips didn’t suit their features.
Here’s the fix:
- Identify your shape (oval, round, square, heart, long) by measuring forehead, cheekbones, and jawline.
- Place contour where shadows naturally fall.
- Highlight high planes to reflect light.
- Blush to balance proportions.
Use contouring for face shapes to tailor placement
First, Find Your Angles: How to Accurately Determine Your Face Shape
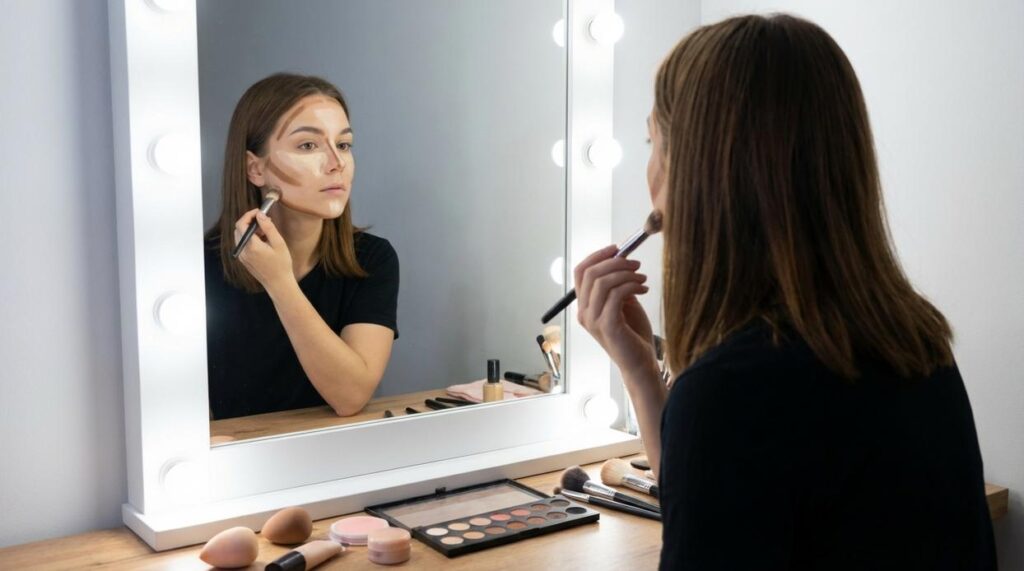
Before you even pick up a brush, pause. Knowing your face shape is the non-negotiable first step to effective makeup application. In other words, if you don’t understand your canvas, your technique won’t land the way you expect (and yes, that includes contour that somehow ends up looking muddy).
So, start simple. Pull your hair back, stand in front of a mirror, and trace the outline of your face using a dry-erase marker or lipstick. This “Mirror Method” gives you a clear visual—no guesswork.
Next, observe the outline. What’s the widest part of your face: forehead, cheekbones, or jaw? Is your jawline sharp and angular, or soft and rounded? Is your face longer than it is wide?
From there, you’ll likely fall into one of five core shapes: Oval, Round, Square, Heart, or Long. Use contouring for face shapes to enhance balance once you’ve identified yours.
Techniques for the Oval Face: Enhancing Natural Balance
An oval face is often considered the most proportionate shape because its length and width are naturally balanced. That doesn’t mean you pile on product (less really is more here).
To refine definition, apply a contour just below the cheekbones, blending upward. The goal is whisper-light shading, not dramatic carving. Think subtle shadow, not reality-TV glam. This is where contouring for face shapes becomes strategic rather than corrective.
Next, highlight the center of the forehead, bridge of the nose, tops of the cheekbones, and cupid’s bow to pull light inward. Then, sweep blush from the apples toward the hairline to lift without shifting proportions.
Wondering what comes next? Consider bronzer placement or brow shaping to maintain harmony.
Techniques for the Round Face: Creating Dimension and Length
The goal with a round face is simple: create structure where softness naturally dominates. I’ll be honest—I love a round face (hello, Selena Gomez glow), but a little sculpting can elevate everything.
Contour: Focus on the perimeter. Apply contour in a “3” shape along the temples, under the cheekbones, and along the jawline. This subtly carves out angles and reduces visual width. Use contouring for face shapes strategically—placing depth near the hairline and jaw creates shadow, and shadow creates shape (it’s basically wearable optical illusion).
Highlight: Keep it vertical. Sweep highlighter down the forehead center, nose bridge, and chin. This draws the eye up and down, elongating the face.
Blush: Skip circular placement. Instead, sweep blush upward toward the temples. An angular lift beats a rounded pop every time.
For extra polish, master eye makeup blending techniques for a professional finish to balance the overall look.
Techniques for the Square Face: Softening Angles and Highlighting
A square face is defined by a broad forehead and a strong, angular jawline. The goal isn’t to hide these features (they photograph beautifully), but to soften and balance them.
When it comes to contouring for face shapes, placement is everything. Think A vs B:
- A: Contouring the cheeks heavily – This can exaggerate sharpness and make the face look boxier.
- B: Contouring the corners – Apply contour to the temples and directly along the jaw’s sharp angles. This subtly rounds the perimeter and creates a smoother outline.
Next, highlight strategically. Rather than sweeping shimmer across the cheekbones (which widens the face), brighten the center of the forehead and the chin. This pulls attention inward—almost like cinematic lighting in a close-up scene.
For blush, choose circular motions on the apples of the cheeks. Unlike angled placement, this adds softness and gentle fullness (think classic Hollywood glam).
Pro tip: Blend upward lightly to avoid re-emphasizing the jawline.
Techniques for the Heart-Shaped Face: Balancing Proportions
The goal with a heart-shaped face is simple: soften the broader forehead and bring gentle fullness to the lower half. Think of it as visual harmony. Use contouring for face shapes to subtly reshape how light and shadow play across your features.
For contour, sweep a matte shade along the temples and into the hairline. Blend until it melts seamlessly—no harsh stripes, just a soft shadow that quietly narrows the upper face. A touch under the chin diffuses sharpness (less point, more polish).
Highlight should GLOW on the lower face. Tap it onto the jawline, the center of the chin, and down the bridge of the nose. Notice how the light catches and draws the eye downward?
Blush works best slightly below the apples of the cheeks. Sweep outward in silky strokes to create the look of fuller, plush cheeks. The result feels balanced, luminous, and effortlessly refined.
Techniques for the Long Face: Adding Width and Fullness
The goal with a long face shape is simple: reduce vertical emphasis and build horizontal balance. In other words, we want the face to appear shorter and wider (think more Zendaya on the red carpet, less stretched selfie lens).
Makeup artists often rely on contouring for face shapes to shift visual proportions. Research in visual perception shows that darker shades recede while lighter shades advance (Livingstone & Hubel, 1988), which is why placement matters.
Contour: Apply contour horizontally at the top of the hairline and along the bottom of the chin and jaw. This subtly “caps” the face, visually shortening length.
Highlight: Sweep highlighter across the tops of cheekbones and blend outward toward the ears to expand width.
Blush: Place blush on the apples and blend straight outward—never downward—to create a horizontal lift.
You’ve moved beyond cookie-cutter tutorials—now the payoff begins. These techniques are tools, not rules, giving you freedom to highlight what makes you unmistakably you. Mastering contouring for face shapes means smarter brush strokes, better balance, and confidence that shows (yes, it’s that visible).
- Grab your mirror and experiment boldly.
Mastering Contouring for Every Face Shape
You came here to finally understand how contouring for face shapes actually works—and now you have the clarity to do it with confidence. Instead of guessing where to place bronzer or highlighter, you know how to enhance your natural structure and avoid the uneven, muddy results that make makeup feel frustrating.
The truth is, using the wrong technique for your face shape can leave you feeling discouraged and stuck. But when you tailor your contour to your unique features, everything changes—your makeup looks lifted, balanced, and professionally done.
Now it’s time to put this into practice. Grab your contour products, identify your face shape, and apply these techniques step by step. If you want flawless, face-sculpting results without the trial and error, explore our expert-backed beauty guides trusted by thousands of makeup lovers. Start refining your routine today and see the difference the right technique makes.